Our Android Application, 100K+ Downloads Download
Close ads ->
Close ads ->
-->

Random Posts

Follow US

Splash Screen - Android Studio

Add A Beautiful Splash Screen To Your Application - Android Studio Project - 2
Share it:

As a continuation of Android Studio Project - 1 . This article is about adding a splash screen to your application you don't need to start a new project edit in the existing project itself , so lets start .....

Refer to my previous post if you don't know to setup android studio and if you are starting a new project . Am writing as if you have already read the previous post so if you have not read check it - Build An Application For Your Website (Android Studio)

Watch The Video And Follow Me :

  1. Open Android Studio.
  2. Start a navigation drawer activity .
  3. Open an existing project or a new one (i am doing it as a continuation of Project - 1)
  4. After the loading and all follow these steps carefully .
 So Our Project Starts From Here ......
  1. Lets start with AndroidManifest.xml
  2. Open  app -> manifest -> AndroidManifest.xml .  
  3. Here we need to set the launch to our splash screen activity created . So we need to change it .
  4. Select the entire codes and replace it with the codes below .
  5. <?xml version="1.0" encoding="utf-8"?>
    <manifest xmlns:android="http://schemas.android.com/apk/res/android"
    package="com.appname.app">
    <uses-permission android:name="android.permission.READ_EXTERNAL_STORAGE" />
    <uses-permission android:name="android.permission.WRITE_EXTERNAL_STORAGE" />
    <uses-permission android:name="android.permission.READ_LOGS" />
    <uses-permission android:name="android.permission.KILL_BACKGROUND_PROCESSES" />
    <uses-permission android:name="android.permission.INTERNET" />
    <uses-permission android:name="android.permission.ACCESS_NETWORK_STATE" />
    <uses-permission android:name="android.permission.RECEIVE_BOOT_COMPLETED" />
    <uses-permission android:name="android.permission.ACCESS_WIFI_STATE" />
    <application
    android:allowBackup="true"
    android:icon="@mipmap/ic_launcher"
    android:label="@string/app_name"
    android:supportsRtl="true"
    android:theme="@style/AppTheme">
    <activity
    android:name=".MainActivity"
    android:label="@string/app_name"
    android:theme="@style/AppTheme.NoActionBar">
    </activity>
    <activity android:name=".splash">
    <intent-filter>
    <action android:name="android.intent.action.MAIN" />
    <category android:name="android.intent.category.LAUNCHER" />
    </intent-filter>
    </activity>
    </application>
    </manifest>
  6. Now move on to the java part .
  7. Open app -> java -> com.appname.app and left click , select New , Then select Java Class .

  8.  Give name splash then click OK .
  9. Now a new java class is created .
  10. Select the entire codes and replace it with the code below .
  11. package com.appname.app;
    import android.content.Intent;
    import android.graphics.Typeface;
    import android.net.Uri;
    import android.os.Handler;
    import android.support.v7.app.AppCompatActivity;
    import android.os.Bundle;
    import android.view.View;
    import android.widget.TextView;
    public class splash extends AppCompatActivity {
    @Override
    protected void onCreate(Bundle savedInstanceState) {
    super.onCreate(savedInstanceState);
    setContentView(R.layout.activity_splash);
    Handler handler = new Handler();
    handler.postDelayed(new Runnable() {
    @Override
    public void run() {
    startActivity(new Intent(splash.this, MainActivity.class));
    finish();
    }
    },5000);
    }
    public void browser1(View view){
    Intent browserIntent = new Intent(Intent.ACTION_VIEW, Uri.parse("https://www.facebook.com/tipsandtricksonandroid"));
    startActivity(browserIntent);
    }
    public void browser2(View view){
    Intent browserIntent = new Intent(Intent.ACTION_VIEW, Uri.parse("https://plus.google.com/+VISHNUS%20TRICKS"));
    startActivity(browserIntent);
    }
    public void browser3(View view){
    Intent browserIntent = new Intent(Intent.ACTION_VIEW, Uri.parse("https://twitter.com/vishnusiva123"));
    startActivity(browserIntent);
    }
    }
    view raw splash.java hosted with ❤ by GitHub
  12. Change the links of Facebook , Google + , Twitter of mine with yours .
  13. Now make a splash screen image for your application , See the example of one which i have created . 
  14. Name the image as splash_img and it must be in PNG format (splash_img.png)
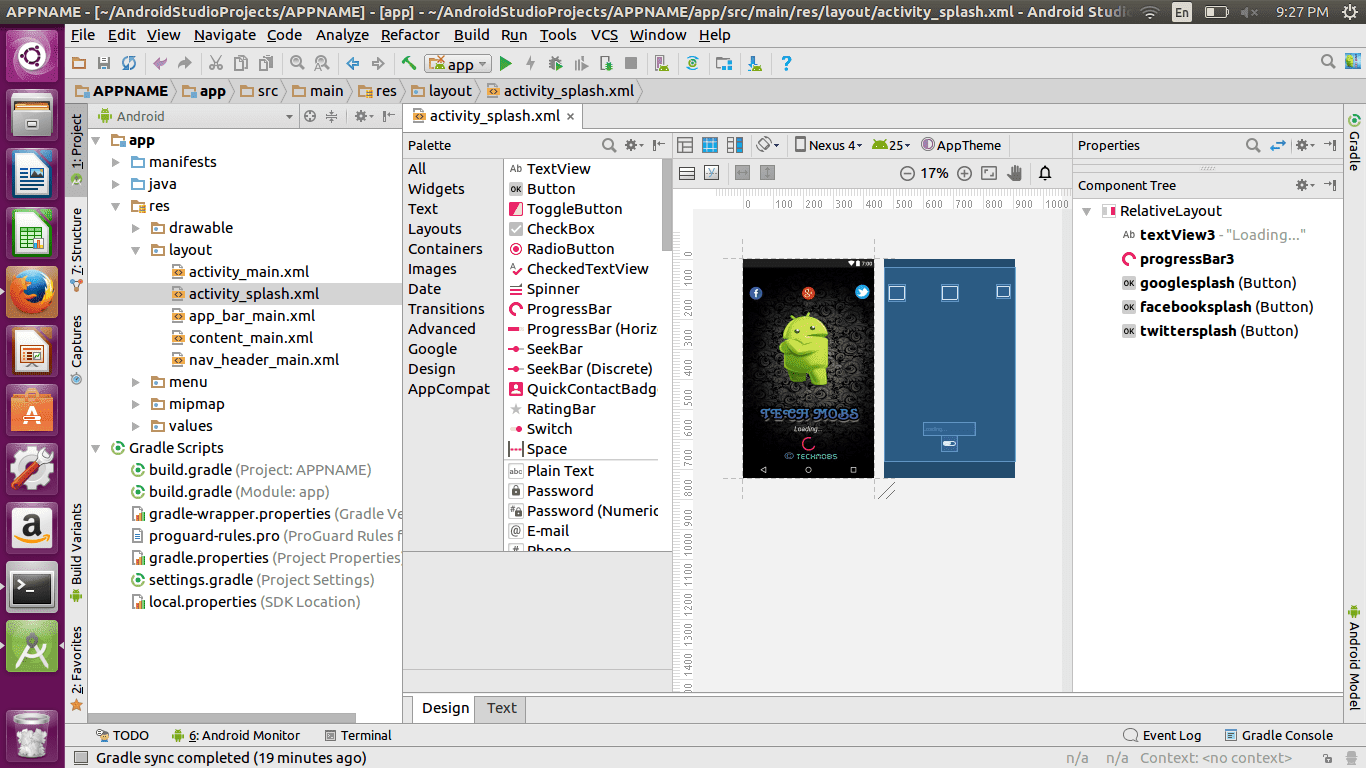
  15. Now Lets Design Our Splash Screen , So Lets Move On To The Layout Part .
  16. Open -> app -> res -> Layout , Left click and select New , then select Layout resource file .

  17. Give it name activity_splash then click OK .
  18. Now new layout for splash screen is created , lets design it .
  19. Select the entire codes and replace it with the code below .
  20. <?xml version="1.0" encoding="utf-8"?>
    <RelativeLayout
    xmlns:android="http://schemas.android.com/apk/res/android"
    xmlns:tools="http://schemas.android.com/tools"
    android:layout_width="match_parent"
    android:layout_height="match_parent"
    tools:context="com.appname.app.splash"
    android:background="@drawable/splash_img"
    tools:layout_editor_absoluteY="25dp"
    tools:layout_editor_absoluteX="0dp">
    <TextView
    android:id="@+id/textView3"
    android:layout_width="154dp"
    android:gravity="center"
    android:layout_height="39dp"
    android:text="Loading..."
    android:textColor="@color/colorWhite"
    android:textSize="20sp"
    android:textStyle="italic"
    tools:layout_editor_absoluteX="115dp"
    tools:layout_editor_absoluteY="92dp"
    android:layout_above="@+id/progressBar3"
    android:layout_centerHorizontal="true" />
    <ProgressBar
    android:id="@+id/progressBar3"
    style="?android:attr/progressBarStyle"
    android:layout_width="wrap_content"
    android:layout_height="wrap_content"
    android:foregroundGravity="bottom|center"
    tools:layout_editor_absoluteX="168dp"
    tools:layout_editor_absoluteY="4dp"
    android:layout_marginBottom="28dp"
    android:layout_alignParentBottom="true"
    android:layout_alignRight="@+id/googlesplash"
    android:layout_alignEnd="@+id/googlesplash" />
    <Button
    android:id="@+id/googlesplash"
    android:layout_width="50dp"
    android:layout_height="50dp"
    android:background="@drawable/gplus"
    android:clickable="true"
    android:onClick="browser2"
    android:shape="ring"
    android:layout_alignTop="@+id/facebooksplash"
    android:layout_centerHorizontal="true" />
    <Button
    android:id="@+id/facebooksplash"
    android:layout_width="50dp"
    android:layout_height="50dp"
    android:layout_alignParentLeft="true"
    android:layout_alignParentStart="true"
    android:layout_alignTop="@+id/twittersplash"
    android:layout_marginLeft="13dp"
    android:layout_marginStart="13dp"
    android:background="@drawable/fb"
    android:clickable="true"
    android:onClick="browser1"
    android:shape="ring" />
    <Button
    android:id="@+id/twittersplash"
    android:layout_width="42dp"
    android:layout_height="42dp"
    android:layout_alignParentEnd="true"
    android:layout_alignParentRight="true"
    android:layout_alignParentTop="true"
    android:layout_marginEnd="13dp"
    android:layout_marginRight="13dp"
    android:layout_marginTop="50dp"
    android:background="@drawable/twitter"
    android:clickable="true"
    android:onClick="browser3"
    android:shape="ring" />
    </RelativeLayout>
  21. Now this is how it looks like in the design part .
  22.  We do have added a new colour (white) , so lets add it in the colour section . 
  23. Open app -> res -> values -> color .
  24.  Select the entire codes and replace it with the code below .
  25. <?xml version="1.0" encoding="utf-8"?>
    <resources>
    <color name="colorPrimary">#3F51B5</color>
    <color name="colorPrimaryDark">#202020</color>
    <color name="colorAccent">#FF4081</color>
    <color name="colorWhite">#ffffff</color>
    <color name="facebook">#1636d6</color>
    <color name="googleplus">#e60d14</color>
    <color name="twitter">#1ccef5</color>
    </resources>
    view raw colors.xml hosted with ❤ by GitHub
  26. Now go to res -> values -> styles.xml
  27. Select the entire codes and replace it with the code below .
  28. <resources>
    <!-- Base application theme. -->
    <style name="AppTheme" parent="Theme.AppCompat.Light.NoActionBar">
    <!-- Customize your theme here. -->
    <item name="colorPrimary">@color/colorPrimary</item>
    <item name="colorPrimaryDark">@color/colorPrimaryDark</item>
    <item name="colorAccent">@color/colorAccent</item>
    </style>
    <style name="AppTheme.NoActionBar">
    <item name="windowActionBar">false</item>
    <item name="windowNoTitle">true</item>
    </style>
    <style name="AppTheme.AppBarOverlay" parent="ThemeOverlay.AppCompat.Dark.ActionBar" />
    <style name="AppTheme.PopupOverlay" parent="ThemeOverlay.AppCompat.Light" />
    </resources>
    view raw styles.xml hosted with ❤ by GitHub
  29. Add this files to the drawable .
  30. Download this file extract the file copy the three pictures go to android studio -> drawable and paste it there . 
  31. OK splash screen have been added successfully to your application .
  32. Now Goto Build -> Build Apk .
 Please Comment If Any Improvements Are Needed Or If You Don't Understand Any Part , I Would Respond As Fast As Possible Or Use Our Online Live Chat Option Which Is Floating On The Left Part Of The Page .


Part 1 - Build An Application For Your Website ( Link To The Post - Click Here )


Part 3 - Set Up An In-Build Update Checker For Your Application ( Link To The Post - Click Here )
Share it:

Vishnu Sivadas

ANDROID STUDIO

Post A Comment:

0 comments: