Do you need a simple application that can view your blog/website ?
In this article i will be teaching you how to make a Simple WebView Application for your blog/website .
- Start a new project .
- Select empty activity .
- Now open app -> res -> layout -> activity_main .
- Simply replace the codes with the bellow codes .
<?xml version="1.0" encoding="utf-8"?>
<RelativeLayout xmlns:android="http://schemas.android.com/apk/res/android"
android:layout_width="match_parent"
android:layout_height="match_parent">
 <WebView
android:id="@+id/webview"
android:layout_width="match_parent"
android:layout_height="match_parent"/>
 <ProgressBar
style="?android:attr/progressBarStyleLarge"
android:layout_centerHorizontal="true"
android:layout_height="match_parent"
android:layout_width="wrap_content"
android:layout_gravity="center_vertical|center_horizontal"
android:id="@+id/prb"/>
</RelativeLayout>
- Now open app -> java -> your package name (com.name.app) -> MainActivity .
- Simply replace the codes with the bellow codes . Don't copy package name .
package com.package.name;

/* Created by Vishnu */
import android.content.Intent;
import android.graphics.Bitmap;
import android.net.Uri;
import android.support.v7.app.AppCompatActivity;
import android.os.Bundle;
import android.view.View;
import android.webkit.WebSettings;
import android.webkit.WebView;
import android.webkit.WebViewClient;
import android.widget.ProgressBar;

public class MainActivity extends AppCompatActivity {

    WebView webView;
    @Override    protected void onCreate(Bundle savedInstanceState) {
        super.onCreate(savedInstanceState);
        setContentView(R.layout.activity_main);
        final ProgressBar progressBar = (ProgressBar) findViewById(R.id.prb);
        webView = (WebView) this.findViewById(R.id.webview);
        webView.setWebViewClient(new WebViewClient() {
            @Override public void onPageStarted(WebView view, String url, Bitmap favicon) {
                super.onPageStarted(view, url, favicon);
                progressBar.setVisibility(View.VISIBLE);
            }
            @Override public boolean shouldOverrideUrlLoading(WebView webView, String url)
            {
                if(url.contains("tipsandtricksonandroid.blogspot")) {
                    webView.loadUrl(url);
                } else startActivity(new Intent("android.intent.action.VIEW", Uri.parse(url)));
                return true;
            }
            @Override public void onPageFinished(WebView view, String url) {
                super.onPageFinished(view, url);
                progressBar.setVisibility(View.GONE);
            }
        });
        WebSettings webSettings = webView.getSettings();
        webSettings.setJavaScriptEnabled(true);
        webSettings.getAllowContentAccess();
        webSettings.getAllowFileAccess();
        webSettings.setDatabaseEnabled(true);
        webSettings.setAppCacheEnabled(true);
        webView.loadUrl("https://tipsandtricksonandroid.blogspot.com");

    }
}
- Replace the links https://tipsandtricksonandroid.blogspot.com and tipsandtricksonandroid.blogspot with your blog/website link . Use the links exactly the way i used, for tipsandtricksonandroid.blogspot don't use the http:// or .com only use the middle part .
- Now one last step . Go to app -> manifest -> AndroidManifest.xml .
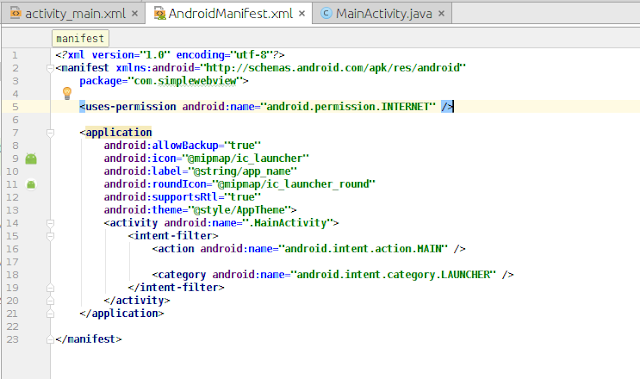
- Add this permission .
<uses-permission android:name="android.permission.INTERNET" />
- Refer this image if you don't know where to add the permission .

- Thats all now build the apk . You application is ready .


Post A Comment:
0 comments: